Thursday, December 23, 2010
MOJO MONOGRAM SET...
I made a monogram card set to go with a 31 Gifts bag that I got my SIL for Christmas. The Just Rite Monogram Stamper sure does make it easy! Used the December Mojo Sketches for the layouts.
Thanks for looking!
Additional Info
Keywords: MOJO monogram
Stamps: Just Rite Monogram Stamper
Paper: basic black, pink passion, dp
Ink: stazon
Accessories: ribbon, blingy brads
Monday, December 20, 2010
GINGERBREAD BOY...
Thursday, December 16, 2010
SAUSAGE & GRITS....
Well, I don't know what the weather is like in your neck of the woods, but around here we are in the middle of a Winter storm ~ our first official "snow day". The kids are off from school, Christmas is right around the corner, company is on their way, and I am in the mood for some major comfort food.
This is one of those recipes I don't make often, but when I do everyone seems to LOVE it, so I thought I would share it with you. This is a make ahead kind of dish. Of course, you can cook it right away. But I like getting up, having my coffee, and just popping it into the oven. I have also started dividing the dish among two pans - cooking one the next day and freezing the other for later! If you love sausage, you will love this dish. If you don't like grits, guess what! You will still like this dish. I brought it to our small group at church and before I had a chance to tell everyone what was in it, it was gone.... and when I told them what was in it, they were surprised. They didn't know about the grits. That's because you cook 'em until they are super creamy...
So, without further ado, here is the scoop on this fabulous dish...
Here are the super stars...
Saute your sausage, remove from grease, add onions and brown. Add back sausage and green chilies. (this alone is yummy).
While you have that going on, cook 1 cup of grits in 4 cups of salted water until thick.
After the grits are done. Add in butter, cheese, 2 eggs slightly beaten and Tabasco. mmmmmmmmmm......
Combine the grits with the sausage mixture, put in a baking pan. Top with some cheddar, parsley and paprika.
I won't be baking this until tomorrow... Once it bakes, the cheese on top gets all gooey and delicious..
Hope you'll try it!!
RECIPE
1 cup uncooked grits 2 cups grated Cheese
1 pound ground sausage 10 dashes Tabasco
1 onion, chopped 1 teaspoon paprika
two 4.5 ounce cans green chilies, chopped 1/4 cup chopped fresh parsley
8 tablespoons (1 stick) butter
2 eggs, beaten
Preheat oven to 325 degrees. Cook grits in 4 cups salted water until thick. Saute sausage, breaking it into small pieces. Saute onion in sausage fat; drain. Add onion and chiles to sausage. Add butter, eggs, cheese and Tabasco to grits. Combine grits mixture with sausage mixture. Pour into a 13x9 inch casserole dish and garnish with additional cheese, chilies, paprika and parsley. Bake for 1 hour. Can be refrigerated up to 2 days before baking. Freezes well.
Bon apetit,
Wednesday, December 15, 2010
BEEZY LITTLE ELF...
Here is what I have been working on for the teachers... Love the little Rudolph candy canes. Since we are expecting weather, they probably won't get them until after Christmas break.
Happy Crafting....
Monday, December 13, 2010
SNOW HAPPY!
Love this image! Aquapainters to color, used this weeks mojo sketch.
Additional Info
Stamps: digi image
Paper: whisper white, early espresso, old olive, basic greyInk: kiwi kiss, cherry cobbler, baja breeze, not quite navy, tangerine tango
Accessories: aquapianter, brads, ribbon, corner rounderMonday, December 6, 2010
SNOW INSPIRED ZINDORF CASE...
I cased a gorgeous card by Michelle Z.. I changed a couple of things. I love how easy it was to make and how it came together quickly. These will be Christmas cards for my hubby to give to his co-workers.
Thanks for looking.
Additional Info
Stamps: Season of Friendship
Paper: whisper white, cherry cobbler, crumb cake
Ink: crumb cake, stazon, not quite navy
Accessories: Martha Stewart snowflake border punch, bling, sponges, ribbon
Thanks for looking.
Additional Info
Stamps: Season of Friendship
Paper: whisper white, cherry cobbler, crumb cake
Ink: crumb cake, stazon, not quite navy
Accessories: Martha Stewart snowflake border punch, bling, sponges, ribbon
Sunday, December 5, 2010
HAPPY HOO-LIDAYS...
Wednesday, November 24, 2010
Turkey Treat Cup Place Card
I have been so busy in the kitchen today with my Mom. As we were working, this idea came to my mind. I knew I wanted to make place cards for the table, but I wasn't sure what I would make. A few things were swirling around in my mind... a turkey I made a couple of years ago for a Thanksgiving card, the millions of treat cups I bought and never used, a bag of Autumn colored m&m's I had - thank goodness the kids or hubby didn't find them... so, after we finished in the kitchen, I ran downstairs and this is what I came up with.
Happy Thanksgiving 2010 everyone!
Additional Info
Keywords: Thanksgiving place card turkey sweet treat cups punch art
Stamps: none
Paper: early espresso, cajun craze, very vanilla, dsp
Ink: none
Accessories: Punches: circle, scallop circle, oval, scallop oval, nestability, ribbon, googlie eyes, sweet treat cup, scallop edge punch
Saturday, November 6, 2010
SR CHRISTMAS CARD SWAP
I used some old MOJO sketches.
Thanks for looking.
Card 1 Additional Info
Stamps: Merry Pursuits by CTMH
Paper: very vanilla, bazzil brown and tan, dp by CTMH
Ink: stazon
Accessories: SU! markers, ribbon, nestabilities, top note die, button, hemp, swirls embossing folder
Card 2 Additional Info
Keywords: SR CTMH christmas merry pursuits
Stamps: Merry Pursuits by CTMH
Paper: whisper white, rich razzleberry, dsp
Ink: stazon, kiwi kiss, rich razzleberry
Accessories: punch, nestability, bling, ribbon, embossing folder, sponging
Sunday, October 31, 2010
SEPTEMBER/OCTOBER SAP ART & ACTIVITES...
Here is a peek at some of the fun we had in the months of September and October.
Dinosaurs make really cool tracks in the playdoh. They are also fun to hide in the playdoh.
All aboard the shape train. This activity helped to intoduce for some and reinforce for others the basic shapes.
In September we spent some time on Nursery Rhymes. We used egg shells to create our Humpty Dumpty, and then fixed his boo-boo with a band-aide.
More fun with dinosaurs. This time with finger paint and triangles.
Black sponge painted bats with orange beads. (colors of the month).
Tuesday, October 26, 2010
OREO MUMMY POPS...
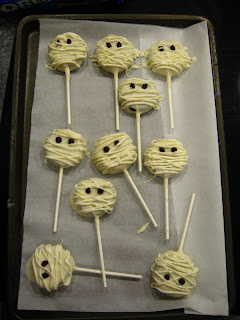
Aren't these little mummies just the cutest. A parent made them for us last year and I just loved them so I had to try them for myself (thanks Kelly!!). I am making about 4.3 million of them for Halloween. They will go to my students as well as the teachers at my kid's elementary school. They are super easy to make. Here is how I made them...
Step 3: Dip cookie into chocolate. Then place on parchment.
Supplies: oreos, candy wafers (white & brown), sticks, bags, ribbon, parchment paper, tray
Step 1: Insert stick into center of oreo cookie. Don't use cookies that are cracked, they will break which may result in foul language.
Step 2: Melt wafers. I used a microwave/oven-safe mug. Will hold 1 bag of wafers. From my experience, it takes about 2 bags of wafers per oreo pack, resulting in approximately 25 mummies. Follow directions for melting on bag. 30 second intervals at 50% power.
Step 3: Dip cookie into chocolate. Then place on parchment.
Step 4: Melt brown chocolate in zippy bag. 15 second intervals at 50% power. Snip corner. The squeeze out to make eyes.
Step 5: Put remaining white chocolate from mug into a zippy bag. Reheat if necessary. Snip corner. Zig-zag across oreo to make the mummy wrap.Step 6: Place tray in freezer for ~15 minutes.
Step 7: Remove from freezer and place in food-safe bags, secure with decorative ribbon. Add a Halloween tag if you like. I may add tags later if I have time.
Thanks for looking!!
JF BOX...
I made several of these for a lady who saw me working on the beehive boxes. I worked on them while two of my kiddos were at their gymnastics class. I think they turned out fantastic! I just love the fuzzy zebra paper (great texture) and the pink glitter paper (more like chipboard). I bought them off the rack from Michael's. The ribbon adds just the right touch. I'm sure she will have fun filling these.
Thanks for looking!
Additional Info
Stamps: serif alphabet
Paper: basic black, zebra print dp, pink glitter by Reflections
Ink: stazon
Accessories: nestabilities, ribbon
Thanks for looking!
Additional Info
Stamps: serif alphabet
Paper: basic black, zebra print dp, pink glitter by Reflections
Ink: stazon
Accessories: nestabilities, ribbon
Subscribe to:
Posts (Atom)